1.认识ORM
ORM ( Object Relation Mapping )是对象/关系映射。它提供了概念性的、易于理解的数据模型,将数据库中的表和内存中的对象建立映射关系。它是随着面向对象的软件开发方法的发展而产生的,面向对象的开发方法依然是当前主流的开发方法。
对象和关系型数据是业务实体的两种表现形式。业务实体在内存中表现为对象,在数据库中表现为关系型数据。内存中的对象不会被永久保存,只有关系型数据库(或NoSQL数据库,或文件) 中的对象会被永久保存。
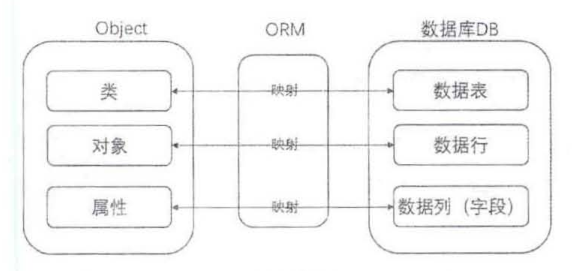
对象/关系映射(ORM)系统一般以中间件的形式存在,因为内存中的对象之间存在关联和继承关系,而在数据库中,关系型数据无法直接表达多对多的关联和继承关系。对象、数据库通过ORM 映射的关系如图所示。
2.JPA
2.1认识 Spring Data
Spring Data是Spring的一个子项目,旨在统一和简化各类型数据的持久化存储方式,而不拘泥于是关系型数据库还是NoSQL数据库。无论是哪种持久化存储方式,数据访问对象(Data Access Objects, DAO)都会提供对对象的增加、删除、修改和查询的方法,以及排序和分页方法等。Spring Data 提供了基于这些层面的统一接口(如:CrudRepository、PagingAndSorting- Repository),以实现持久化的存储。Spring Data包含多个子模块,主要分为主模块和社区模块。
(1)主要模块
- Spring Data Commons:提供共享的基础框架,适合各个子项目使用,支持跨数据库持久化。
- Spring Data JDBC:提供了对 JDBC 的支持,其中封装了 JDBCTemplate
- Spring Data JDBC Ext:提供了对JDBC的支持,并扩展了标准的JDBC,支持Oracle RAD、高级队列和高级数据类型。
- Spring Data JPA:简化创建JPA数据访问层和跨存储的持久层功能。
- Spring Data KeyValue:集成了Redis和Riak,提供多个常用场景下的简单封装,便于构建 key-value 模块。
- Spring Data LDAP:集成了 Spring Data repository 对 Spring LDAP 的支持。
- Spring Data MongoDB:集成了对数据库 MongoDB 支持。
- Spring Data Redts:集成了对 Redis 的支持。
- Spring Data REST:集成了对 RESTful 资源的支持。
- Spring Data for Apache Cassandra :集成了对大规模、高可用数据源 Apache Cassandra 的支持。
- Spring Data for Apace Geode:集成了对 Apache Geode 的支持。
- Spring Data for Apache Solr:集成了对 Apache Solr 的支持
- Spring Data for Pivotal GemFire:集成了对 Pivotal GemFire 的支持。
(2)社区模块
- Spring Data Aerospike:集成了对 Aerospike 的支持
- Spring Data ArangoDB:集成了对 ArangoDB 的支持
- Spring Data Couchbase:集成了对 Couchbase 的支持
- Spring Data Azure Cosmos DB:集成了对 Azure Cosmos 的支持。
- Spring Data Cloud Datastore:集成了对 Google Datastore 的支持。
- Spring Data Cloud Spanner:集成了对 Google Spanner 的支持。
- Spring Data DynamoDB:集成了对 DynamoDB 的支持。
- Spring Data Elasticsearch:集成了对搜索引擎框架 Elasticsearch 的支持。
- Spring Data Hazelcast:集成了对 Hazelcast 的支持。
- Spring Data Jest:集成了对基于 Jest REST client 的 Elasticsearch 的支持。
- Spring Data Neo4j:集成了对Neo4j数据库的支持。
- Spring Data Vault:集成了对 Vault 的支持。
2.2认识JPA
JPA (Java Persistence API )是Java的持久化API,用于对象的持久化。它是一个非常强大的ORM持久化的解决方案,免去了使用JDBCTemplate开发的编写脚本工作。JPA通过简单约定好接口方法的规则自动生成相应的JPQL语句,然后映射成POJO对象。
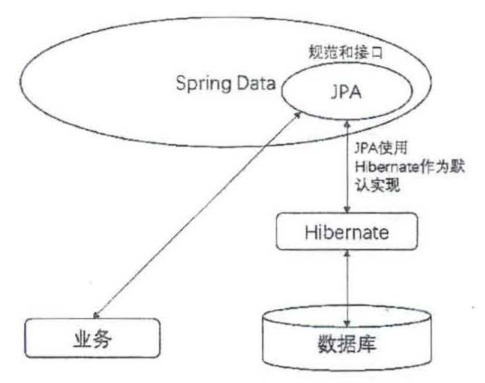
JPA是一个规范化接口,封装了Hibernate的操作作为默认实现,让用户不通过任何配置即可完成数据库的操作。JPA、Spring Date和Hibernate的关系如图所示。
Hibernate 主要通过 hibernate-annotation、hibernate-entitymanager、hibernate-core 三个组件来操作数据。
- hibernate-annotation: 是Hibernate 支持 annotation 方式配置的基础,它包括标准的 JPA annotations、Hibernate 自身特殊功能的 annotation
- hibernate-core:是Hibernate的核心实现,提供了 Hibernate所有的核心功能。
- hibernate-entitymanager:实现了标准的 JPA,它是 hibernate-core 和 JPA 之间的适配器,它不直接提供ORM的功能,而是对hibernate-core 行封装,使得Hibernate符合JPA的规范。
可使用以下代码来创建实体类
@Data
@Entity
public class User{
    private int id;
    @Id
    @GeneratedValue(strategy = GenerationType.IDENTITY)
    private String name;
    private int age;
}
对比JPA与JDBCTemplate创建实体的方式可以看出:JPA的实现方式简单明了,不需要重写映射(支持自定义映射),只需要设置好属性即可。id的自増由数据库自动管理,也可以由程序管理,其他的工作JPA自动处理好了。
2.3使用JPA
(1)添加JPA和MySQL数据库的依赖
<dependency>
    <groupId>org.springframework.boot</groupId>
    <artifactId>spring-boot-starter-data-jpa</artifactId>
</dependency>
<dependency>
    <groupId>mysql</groupId>
    <artifactId>mysql-connector-java</artifactId>
    <scope>runtime</scope>
</dependency>
(2)配置数据库连接信息
Spring Boot项目使用MySQL等关系型数据库,需要配置连接信息,可以在 application.yml文件中进行配置。以下代码配置了与MySQL数据库的连接信息:
spring:
  jpa:
    hibernate:
      ddl-auto: update
    show-sql: true
  jooq:
    sql-dialect: org.hibernate.dialect.Mysql5InnoDBDialect
  datasource:
    driver-class-name: com.mysql.cj.jdbc.Driver
    url: jdbc:mysql://localhost:3306/springboot?useUnicode=true&characterEncoding=utf-8&serverTimezone=UTC&useSSL=true
    username: root
    password: 123456
代码解释如下。
- spring.datasource.username :要填写的数据库用户名。
- spring.datasource.password :要填写的数据库密码。
- spring.jpa.show-sql= true:开发工具的控制台是否显示SQL语句,建议打开。
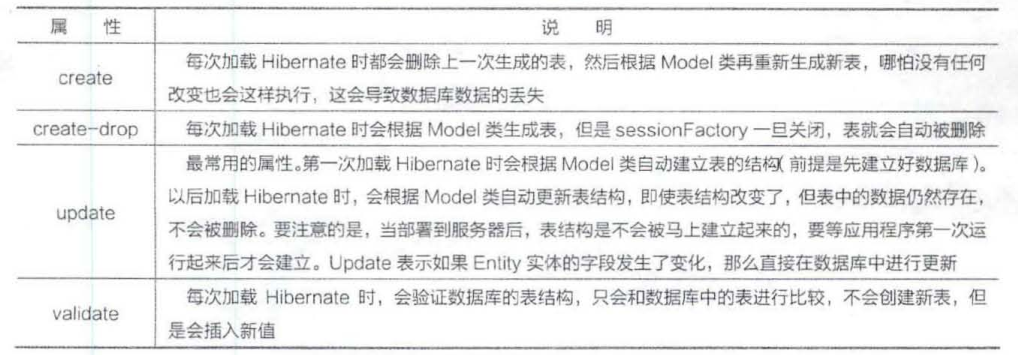
- spring.jpa.properties.hibernate.hbm2ddl.auto : hibernate 的配置属性,其主要作用 是:自动创建、更新、验证数据库表结构。该参数的几种配置见下表
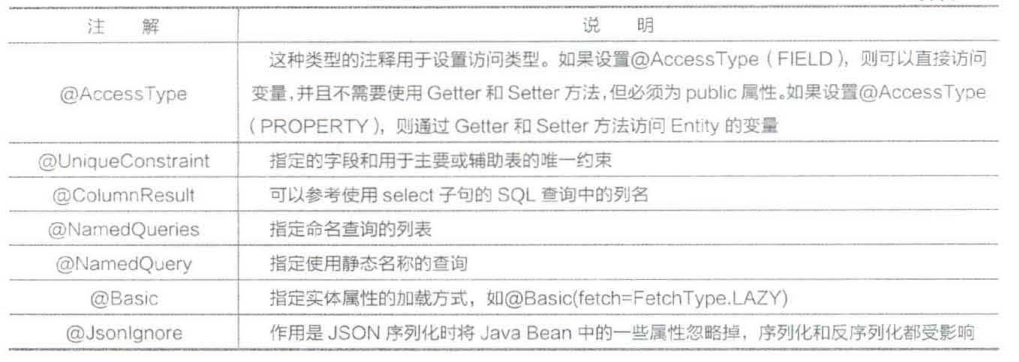
2.4了解JPA注解和属性
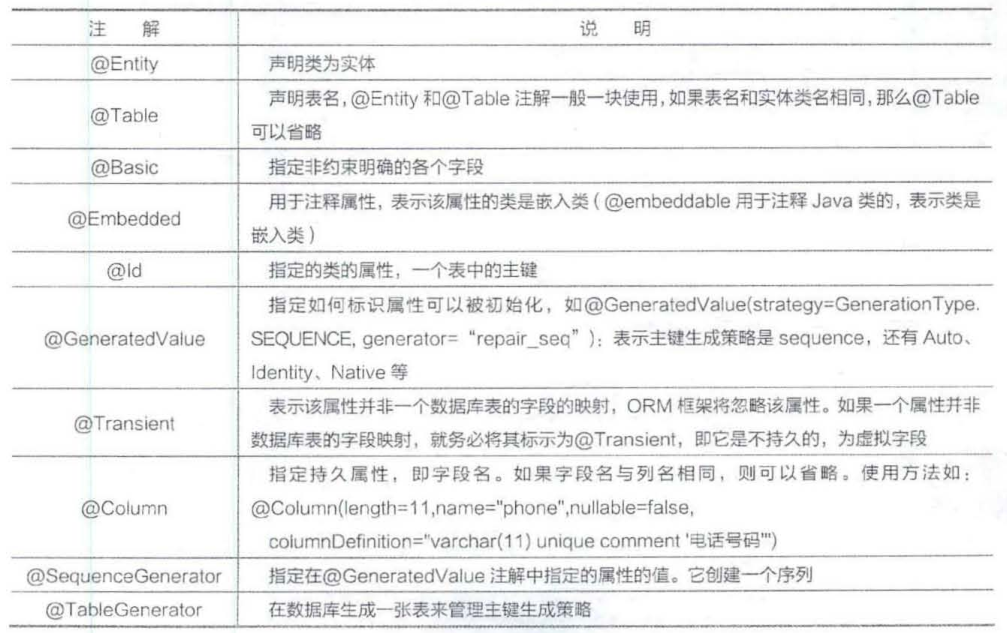
(1)JPA的常用注解
(2)映射关系的注解

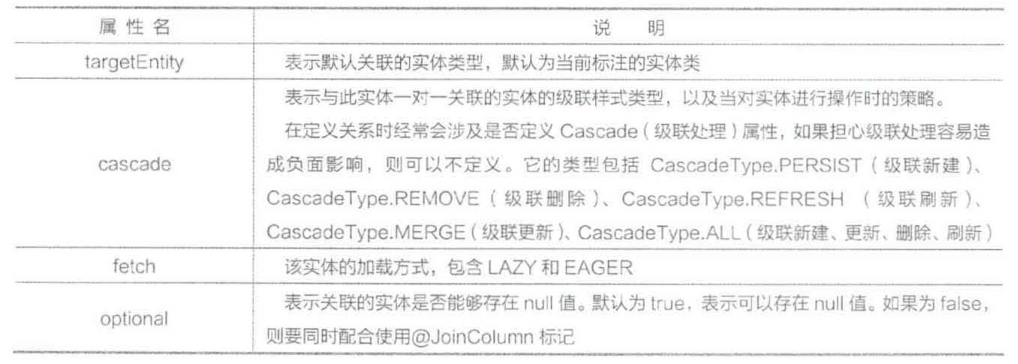
(3)映射关系的属性

在 Spring Data JPA 中,要控制 Session 的生命周期:否则会出现”could not initialize proxy
[xxxx#18]-no Session”错误。可以在配置文件中配置以下代码来控制Session的生命周期:
open-in-view: true
properties:
  hibernate:
    enable_lazy_load_no_trans: true
2.5 实例:用JPA构建实体数据表
package com.itheima.domain;

import lombok.Data;
import javax.persistence.*;
import javax.validation.constraints.NotEmpty;
import javax.validation.constraints.Size;
import java.awt.*;
import java.io.Serializable;
import java.util.Arrays;

@Entity
@Data
public class Article implements Serializable {
    @Id
    @GeneratedValue(strategy = GenerationType.IDENTITY)
    /**
     * Description: IDENTITY代表由数据库控制,auto代表由Spring Boot应用程序统一控制(有多个表时,id 的自增值不一定从1开始)
     */
    private long id;
    @Column(nullable = false,unique = true)
    @NotEmpty(message = "标题不能为空")
    private String title;
    /**
     *	Description:枚举类型
     */
    @Column(columnDefinition = "enum('图','图文','文')")
    private String type;//类型
    /**
     *	Description: Boolean 类型默认false
     */
    private Boolean available= Boolean.FALSE;
    @Size(min = 0,max = 20)
    private String keyword;
    @Size(max = 255)
    private String description;
    @Column(nullable = false)
    private String body;
    /**
     * Description:创建虚拟字段
     */
    @Transient
    private List keywordlists;
    public List getKeywordlists(){
        return (List) Arrays.asList(this.keyword.trim().split("|"));
    }
    public void setKeywordlists(List keywordlists) {
        this.keywordlists = keywordlists;
    }
}
2.6认识JPA的接口
JPA提供了操作数据库的接口。在开发过程中继承和使用这些接口,可简化现有的持久化开发 工作。可以使Spring找到自定义接口,并生成代理类,后续可以把自定义接口注入Spring容器中进行管理。在自定义接口过程中,可以不写相关的SQL操作,由代理类自动生成。
(1)JPA 接口 JpaRepository
JpaRepository 继承自 PagingAndSortingRepository, 该接口提供了 JPA 的相关实用功能, 以及通过Example进行查询的功能。Example对象是JPA提供用来构造查询条件的对象。该接口的关键代码如下:
public interface JpaRepository<T, ID> extends PagingAndSortingRepository<T, ID>, Query By ExampleExecutor<T> {}
在上述代码中,T表示实体对象,ID表示主键。ID必须实现序列化。
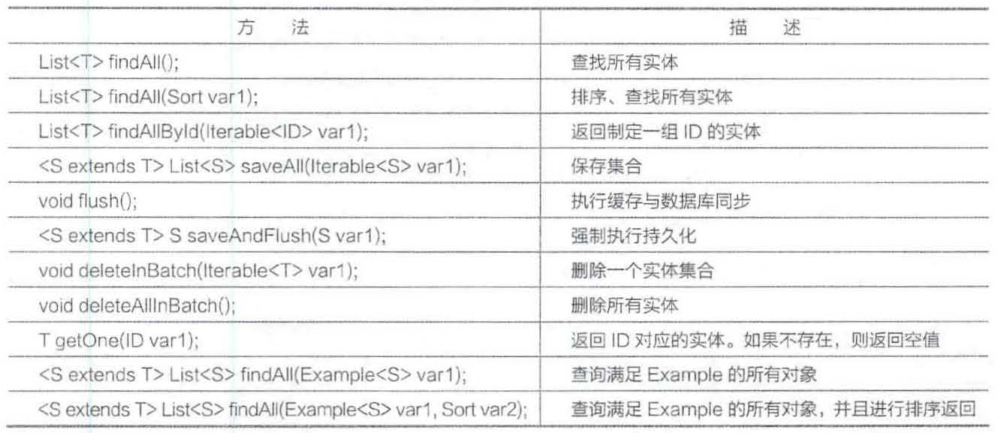
JpaRepository提供的方法见下表
(2)分页排序接口 PagingAndSortingRepository
PagingAndSortingRepository继承自CrudRepository提供的分页和排序方法。其关键代码如下:
@NoRepositoryBean
public interface PagingAndSortingRepository<T, ID> extends CrudRepository<T, ID> {
lterable<T> findAll(Sort var1);
Page<T> findAII(Pageable var1);
}
其方法有如下两种。
- lterable<T> findAII(Sort sort):排序功能。它按照”sort”制定的排序返回数据。
- Page<T> findAII(Pageable pageable):分页查询(含排序功能),
(3)数据操作接口 CrudRepository
CrudRepository接口继承自Repository接口,并新增了增加、删除、修改和查询方法。
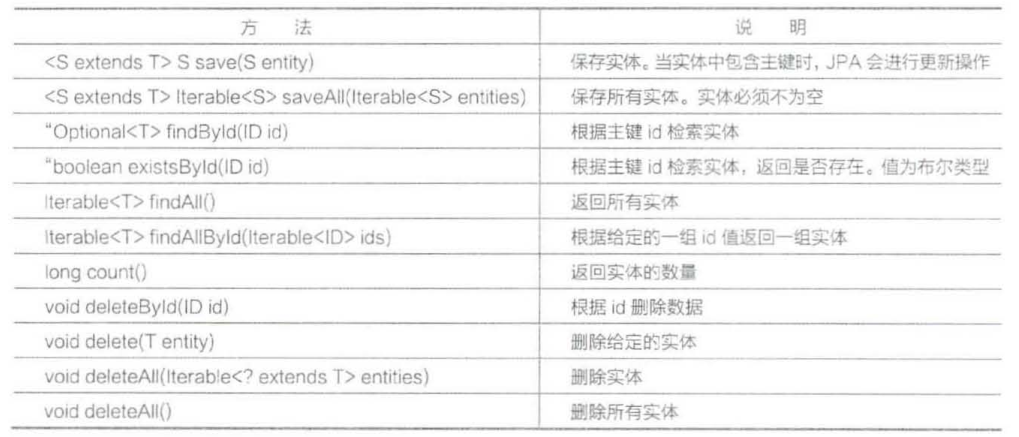
CrudRepository提供的方法见下表
(4)分页接口 Pageable 和 Page
@RequestMapping("/article")
public ModelAndView articleList(@RequestParam(value = "start",defaultValue = "0") Integer start,
                                @RequestParam(value = "limit",defaultValue = "10") Integer limit){
    start = start < 0?0:start;
    Sort sort = new Sort(Sort.Direction.DESC,"id");
    Pageable pageable = PageRequest.of(start, limit, sort);
    Page<Article> page = articleRepository.findAll(pageable);
    ModelAndView mav = new ModelAndView("admin/article/list");
    mav.addObject("page",page);
    return mav;
}
(5)排序类Sort
Sort类专门用来处理排序。最简单的排序就是先传入一个属性列,然后根据属性列的值进行排序。默认情况下是升序排列。它还可以根据提供的多个字段属性值进行排序。例如以下代码是通过 Sort.Order对象的List集合来创建Sort对象的:
List<Sort.Order> orders = new ArrayList<Sort.Order>();
orders.add(new Sort.Order(Sort.Direction.DESC,"id"));
orders.add(new Sort.Order(Sort.Direction.ASC,"view"));
Pageable pageable = PageRequest.of(start,limit,sort);
Pageable pageable = PageRequest.of(start,limit,Sort.by(orders));
Sort排序的方法还有下面几种:
- 直接创建Sort对象,适合对单一属性做排序。
- 通过Sort.Order对象创建Sort对象,适合对单一属性做排序。
- 通过属性的List集合创建Sort对象,适合对多个属性采取同一种排序方式的排序。
- 通过Sort.Order对象的List集合创建Sort对象,适合所有情况,比较容易设置排序方式。
- 忽略大小写排序。
- 使用JpaSort.unsafe进行排序。
- 使用聚合函数进行排序。
3.JPA的查询方式
3.1使用约定方法名
约定方法名一定要根据命名规范来写,Spring Data会根据前缀、中间连接词(Or、And、Like、NotNull等类似SQL中的关键词)、内部拼接SQL代理生成方法的实现。约定方法名的方法见下表
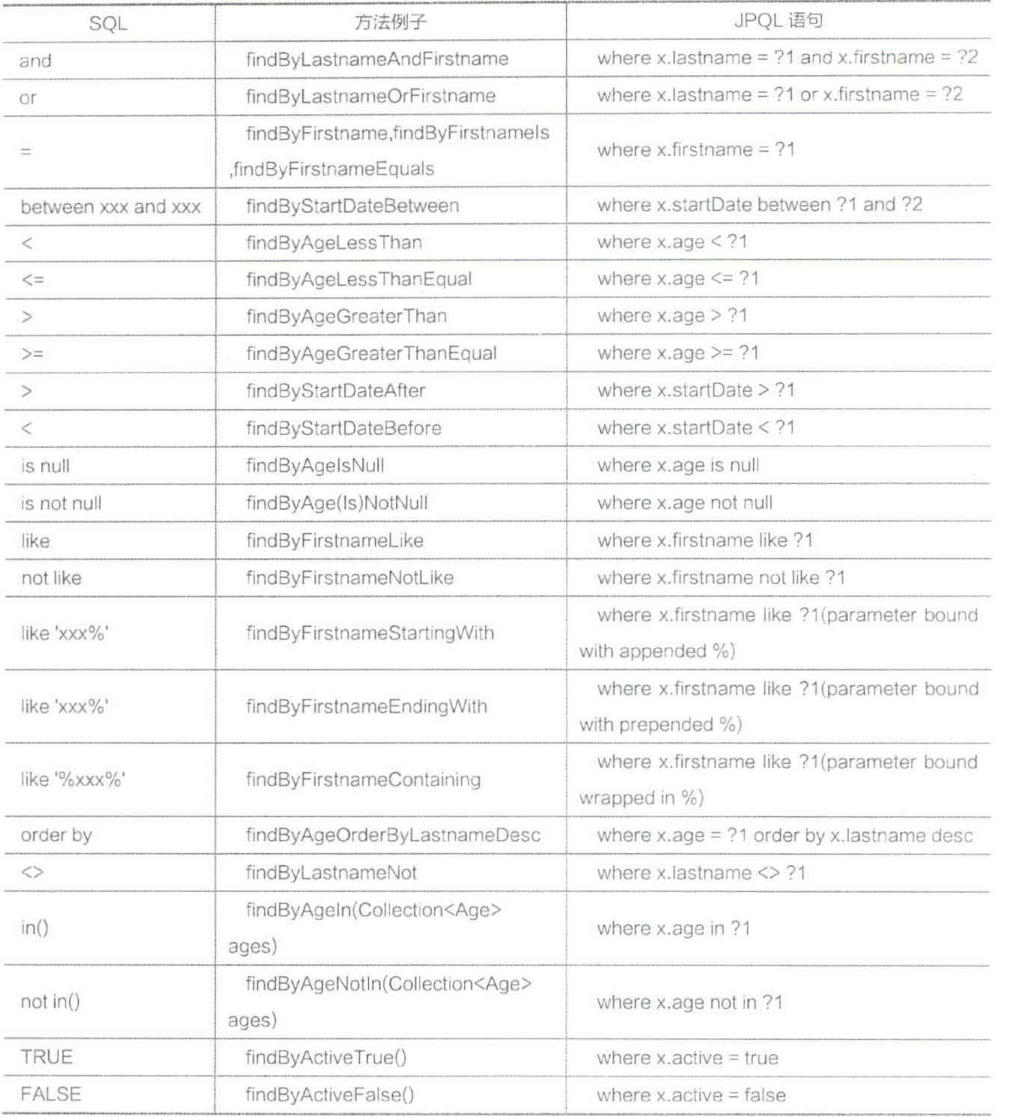
接口方法的命名规则也很简单,只要明白And、Or、Is、Equal、Greater、StartingWith等英文单词的含义,就可以写接口方法。具体用法如下:
package com.itheima.domain;
import org.springframework.data.repository.Repository;
import java.util.List;
public interface UserRepository extends Repository<User,Long> {
    List<User> findByEmailOrName(String email,String name);
}
上述代码表示,通过email或name来查找User对象。
约定方法名还可以支持以下几种语法:
- User findFirstByOrderByNameAsc()
- Page<User> queryFirst100ByName(String name, Pageable pageable)
- Slice<User> findTop100ByName(String name, Pageable pageable)
- List<User> findFirst100ByName(String name, Sort sort)
- List<User> findTop100ByName(String name, Pageable pageable)
3.2用JPQL进行查询
JPQL语言(Java Persistence Query Language)是一种和SQL非常类似的中间性和对象化查询语言,它最终会被编译成针对不同底层数据库的SQL语言,从而屏蔽不同数据库的差异。
JPQL语言通过Query接口封装执行,Query接口封装了执行数据库查询的相关方法。调用 EntityManager的Query、NamedQuery及NativeQuery方法可以获得查询对象,进而可调用 Query接口的相关方法来执行查询操作。
JPQL是面向对象进行查询的语言,可以通过自定义的JPQL完成UPDATE和DELETE操作。JPQL不支持使用INSERT,对于UPDATE或DELETE操作,必须使用注解@Modifying 进行修饰。
(1)下面代码表示根据name值进行查找
public interface UserRepository extends JpaRepository<User,Long> {
    @Query("select u from User u where u.name = ?1")
    User findByName(String name);
}
(2)下面代码表示根据name值逬行模糊查找
public interface UserRepository extends JpaRepository<User,Long> {
    @Query("select u from User u where u.name like %?1")
    List<User> findByName(String name);
}
3.3用原生SQL进行查询
(1)根据ID查询用户
@Override
@Query(value = "select * from user u where u.id = :id", nativeQuery = true)
Optional<User> findById(@Param("id") Long id);
(2)查询所有用户
@Query(value = "select * from user", nativeQuery = true)
List<User> findAllNative();
(3)根据email查询用户
@Query(value = "select * from user where email = ?1", nativeQuery = true)
User findByEmail(String email);
(4)根据name查询用户,并返回分页对象Page
@Query(value = "select * from user where name = ?1",
    countQuery = "select count(*) from user where name = ?1",
    nativeQuery = true)
Page<User> findByName(String name, Pageable pageable);
(5)根据名字来修改email的值
@Modifying
@Query("update user set email = :email where name = :name")
Void updateUserEmaliByName(@Param("name") String name,@Param("email") String email);
3.4 用 Specifications 进行查询
如果要使 Repository 支持 Specification 查询,则需要在 Repository 中继承 JpaSpecification- Executor接口,具体使用见如下代码:
package com.itheima.executor;
import com.itheima.dao.ArticleRepository;
import com.itheima.domain.Article;
import org.junit.Test;
import org.junit.runner.RunWith;
import org.springframework.beans.factory.annotation.Autowired;
import org.springframework.boot.test.context.SpringBootTest;
import org.springframework.data.domain.Page;
import org.springframework.data.domain.PageRequest;
import org.springframework.data.jpa.domain.Specification;
import org.springframework.test.context.junit4.SpringRunner;
import javax.persistence.criteria.*;
@SpringBootTest
@RunWith(SpringRunner.class)
public class testJpaSpecificationExecutor {
    @Autowired
    private ArticleRepository articleRepository;
    @Test
    public void testJpaSpecificationExecutor(){
        int pageNo = 0;
        int pageSize = 5;
        PageRequest pageable = PageRequest.of(pageNo,pageSize);
        Specification<Article> specification = new Specification<Article>(){
            @Override
            public Predicate toPredicate(Root<Article> root, CriteriaQuery<?> criteriaQuery, CriteriaBuilder criteriaBuilder) {
                Path path = root.get("id");
                Predicate predicate1 = criteriaBuilder.gt(path,2);
                Predicate predicate2 = criteriaBuilder.equal(root.get("num"),42283);
                Predicate predicate = criteriaBuilder.and(predicate1,predicate2);
                return predicate;
            }
        };
        Page<Article> page = articleRepository.findAll(specification,pageable);
        System.out.println("总记录数:"+page.getTotalElements());
        System.out.println("当前第:"+(page.getNumber()+1)+"页");
        System.out.println("总页数:"+page.getTotalPages());
        System.out.println("当前页面的List:"+page.getContent());
        System.out.println("当前页面的记录数:"+page.getNumberOfElements());
    }
}
代码解释如下。
- CriteriaQuery接口: specific的顶层查询对象,它包含查询的各个部分,比如,select、from、 where、group by、order by等。CriteriaQuery对象只对实体类型或嵌入式类型的Criteria 查询起作用。
- root:代表查询的实体类是Criteria查询的根对象,Criteria查询的根定义了实体类型,能为将来的导航获得想要的结果。它与SQL查询中的From子句类似。Root实例是类型化的, 且规定了 From子句中能够出现的类型。查询根实例通过传入一个实体类型给 AbstractQuery.from 方法获得。
- query:可以从中得到Root对象,即告知JPA Criteria查询要查询哪一个实体类。还可以添加查询条件,并结合EntityManager对象得到最终查询的TypedQuery对象。
- CriteriaBuilder对象:用于创建Criteria相关对象的工厂,可以从中获取到Predicate 对象。
- Predicate类型:代表一个查询条件。
运行上面的测试代码,在控制台会输出如下结果(确保数据库己经存在数据):
Hibernate: select card0_.id as id1_0_, card0_.num as num2_0_ from card card0_ where card0_.id>2 and card0_.num=422803 limit ?
Hibernate: select count(cardO_.id) as col_0_0_ from card card0_ where cardO_Jd>2 and card0_.num=422803
总记录数:6
当前第:1页 总页数:2 当前页面的 List:
[Card(id=4, num二422803), Card(id=8, num=422803), Card(id=10, num=422803), Card(id=20t num=422803), Card(id=23, num=422803)]
当前页面的记录数:5
3.5 用 ExampleMatcher 进行查询
Spring Data可以通过Example对象来构造JPQL查询,具体用法见以下代码:
User user = new User();
user.setName("test");
ExampleMatcher matcher = ExampleMatcher.matching()
        .withIgnorePaths("name")
        .withIncludeNullValues()
        .withStringMatcher(ExampleMatcher.StringMatcher.ENDING);
Example<User> example = Example.of(user,matcher);
List<User> list = userRepository.findAll(example);
3.6 用谓语QueryDSL进行查询
QueryDSL也是基于各种ORM之上的一个通用查询框架,它与Spring Data JPA是同级别的。 使用QueryDSL的API可以写岀SQL语句(Java代码,非真正标准SQL),不需要懂SQL语句。 它能够构建类型安全的查询。这与JPA使用原生查询时有很大的不同,可以不必再对“Object[]’ 进行操作。它还可以和JPA联合使用。
4.用JPA开发文章管理模块
4.1实现文章实体
@Entity
@Data
public class Article extends BaseEntity implements Serializable {
    @Id
    @GeneratedValue(strategy = GenerationType.IDENTITY)
    private long id;
    @Column(nullable = false,unique = true)
    @NotEmpty(message = "标题不能为空")
    private String title;
    @Column(nullable = false)
    private String body;
}
代码解释如下:
- @Entity:声明它是个实体,然后加入了注解@Data, @Data是Lombok插件提供的注解, 以简化代码,自动生成Getter、Setter方法。文章的属性字段一般包含id、title、keyword、body,以及发布时间、更新时间、处理人。这里只简化设置文章id、关键词、标题和内容。
- @GeneratedValue:将 id 作为主键。GenerationType 为“identity”,代表由数据库统 一控制id的自增。如果属性为“auto”,则是Spring Boot控制id的自增。使用identity 的好处是,通过数据库来管理表的主键的自增,不会影响到其他表
- nullable = false, unique = true:建立唯一索引,避免重复。
- @NotEmpty(message =”标题不能为空”):作为提示和验证消息。
4.2 实现数据持久层
@Service
public interface ArticleRepository extends JpaRepository<Article,Long>,
        JpaSpecificationExecutor<Article>{
    Article findById(long id);
}
4.3 通过创建服务接口和服务接口的实现类来完成业务逻辑功能
(1)创建服务接口,见以下代码
public interface ArticleService {
    public List<Article> getArticleList();
    public Article findArticleById(long id);
}
(2)编写服务接口的实现
在impl包下,新建article的impl实现service,并标注这个类为service服务类。
通过implements声明使用ArticleService接口,并重写其方法,见以下代码:
@Service
public class ArticleServiceImpl implements ArticleService{
    @Autowired
    private ArticleRepository articleRepository;
    @Override
    public List<Article> getArticleList() {
        return articleRepository.findAll();
    }
    @Override
    public Article findArticleById(long id) {
        return articleRepository.findById(id);
    }
}
(3)实现增加、删除、修改和查询的控制层API功能
package com.itheima.controller;

import com.itheima.dao.ArticleRepository;
import com.itheima.domain.Article;
import org.springframework.beans.factory.annotation.Autowired;
import org.springframework.data.domain.Page;
import org.springframework.data.domain.PageRequest;
import org.springframework.data.domain.Pageable;
import org.springframework.data.domain.Sort;
import org.springframework.stereotype.Controller;
import org.springframework.web.bind.annotation.*;
import org.springframework.web.servlet.ModelAndView;

@Controller
@RequestMapping("article")
public class ArticleController {
    @Autowired
    private ArticleRepository articleRepository;
    @RequestMapping("")
    public ModelAndView articlelist(@RequestParam(value = "start",defaultValue = "0")Integer start,
                                    @RequestParam(value = "limit",defaultValue = "5")Integer limit) {
        start = start < 0 ? 0 : start;
        Sort sort = Sort.by(Sort.Direction.DESC, "id");
        Pageable pageable = PageRequest.of(start, limit, sort);
        Page<Article> page = articleRepository.findAll(pageable);
        ModelAndView mav = new ModelAndView("article/list");
        mav.addObject("page", page);
        return mav;
    }
    @GetMapping("/{id}")
    public ModelAndView getArticle(@PathVariable("id") long id) {
        Article article = articleRepository.findById(id);
        ModelAndView mav = new ModelAndView("article/show");
        mav.addObject("article", article);
        return mav;
    }
    @GetMapping("/add")
    public String addArticle(){
        return "article/add";
    }
    @PostMapping("")
    public String saveArticle(Article model){
        articleRepository.save(model);
        return "redirect:/article/";
    }
    @DeleteMapping("/{id}")
    public String deleteArticle(@PathVariable("id") long id){
        articleRepository.deleteById(id);
        return "redirect:";
    }
    @GetMapping("/edit/{id}")
    public ModelAndView editArticle(@PathVariable("id") long id) {
        Article model = articleRepository.findById(id);
        ModelAndView mav = new ModelAndView("article/edit");
        mav.addObject("article", model);
        return mav;
    }
    @PutMapping("/{id}")
    public String editArticleSave(Article model,long id){
        model.setId(id);
        articleRepository.save(model);
        return "redirect:";
    }
}
5.实现自动填充字段
在操作实体类时,通常需要记录创建时间和更新时间。如果每个对象的新增或修改都用手工来操作,则会显得比较烦琐。这时可以使用Spring Data JPA的注解@EnableJpaAuditing来实现自动填充字段功能。具体步骤如下。
(1)开启JPA的审计功能
通过在入口类中加上注解@EnableJpaAuditing,来开启JPA的Auditing功能
(2)创建基类
@Data
@MappedSuperclass
@EntityListeners(AuditingEntityListener.class)
public abstract class BaseEntity {
    @CreatedDate
    private Long createTime;     //createTime
    @LastModifiedDate
    private Long updateTime;     //updateTime
    @Column(name = "create_by")
    @CreatedBy
    private Long createBy; //createBy
    @Column(name = "lastmodified_by")
    @LastModifiedBy
    private Long lastModifiedBy; //lastModifiedBy
}
(3)赋值给 CreatedBy 和 LastModifiedBy
上述代码已经自动实现了创建和更新时间赋值,但是创建人和最后修改人并没有赋值,所以需要实现”AuditorAware”接口来返回需要插入的值
public class InjectAuditor implements AuditorAware<String> {
    //给 Bean 中的 @CreatedBy @LastModifiedBy 注入操作人
    @Override
    public Optional<String> getCurrentAuditor() {
        SecurityContext securityContext = SecurityContextHolder.getContext();
        if (securityContext==null) {
            return null;
        }
        if (securityContext.getAuthentication()==null) {
            return null;
        }else {
            String loginUserName = securityContext.getAuthentication().getName();
            Optional<String> name = Optional.ofNullable(loginUserName);
            return name;
        }
    }
}
代码解释如下。
@Configuration:表示此类是配置类。让Spring来加我该类配置。
SecurityContextHolder:用于获取 SecurityContext,其存放了 Authentication 和特定于请求的安全信息。这里是判断用户是否登录。如果用户登录成功,则荻取用户名,然后把用户名返回给操作人。
(4)使用基类
要在其他类中使用基类,通过在其他类中继承即可
6.关系映射开发
6.1认识实体间关系映射
对象关系映射(object relational mapping )是指通过将对象状态映射到数据库列’来开发和 维护对象和关系数据库之间的关系。它能够轻松处理(执行)各种数据库操作,如插入、更新、 删除等
(1)映射方向
ORM的映射方向是表与表的关联(join ),可分为两种。
- 单向关系:代表一个实体可以将属性引用到另一个实体。即只能从A表向B表进行联表查询。
- 双向关系:代表每个实体都有一个关系字段(属性)引用了其他实体。
(2)ORM映射类型
- 一对一 (@OneToOne):实体的每个实例与另一个实体的单个实例相关联。
- 一对多(@OneToMany): 一个实体的实例可以与另一个实体的多个实例相关联。
- 多对一(@ManyToOne): 一个实体的多个实例可以与另一个实体的单个实例相关联。
- 多对多(@ManyToMany):—个实体的多个实例可能与另一个实体的多个实例有关。在 这个映射中,任何一方都可以成为所有者方。
实例:实现一对一映射
“一对一”映射首先要确定实体间的关系,并考虑表结构,还要考虑实体关系的方向性。
若为双向关联,则在保存实体关系的实体中要配合注解@JoinColumn。在没有保存实体关系 的实体中,要用mappedBy属性明确所关联的实体。
(1)编写实体
package com.itheima.domain;

import lombok.Data;
import javax.persistence.*;

@Entity
@Data
@Table(name = "stdu")
public class Student {
    @Id
    @GeneratedValue(strategy = GenerationType.IDENTITY)
    private Long id;
    private String name;
    @Column(columnDefinition = "enum('male','female')")
    private String sex;
    @OneToOne(cascade = CascadeType.ALL)
    @JoinColumn(name = "card_id")
    private Card card;
}
package com.itheima.domain;
import lombok.Data;
import javax.persistence.*;
@Entity
@Data
@Table(name = "card")
public class Card {
@Id
@GeneratedValue(strategy = GenerationType.IDENTITY)
private long id;
private Integer num;
}(2)编写 Repository 层
package com.itheima.repository;

import com.itheima.domain.Card;
import org.springframework.data.jpa.repository.JpaRepository;
import java.util.Optional;

public interface CardRepository extends JpaRepository<Card,Long>{
    @Override
    Optional<Card> findById(Long id);
}
package com.itheima.repository;
import com.itheima.domain.Student;
import org.springframework.data.jpa.repository.JpaRepository;
import java.util.Optional;
public interface StudentRepository extends JpaRepository<Student,Long> {
@Override
Optional<Student> findById(Long id);
@Override
void deleteById(Long id);
}(3)编写Service层
package com.itheima.service;

import com.itheima.domain.Card;
import java.util.List;
import java.util.Optional;

public interface CardService {
    public List<Card> getCardList();
    public Optional<Card> findCardById(Long id);
}
package com.itheima.service;
import com.itheima.domain.Student;
import java.util.List;
import java.util.Optional;
public interface StudentService {
public List<Student> getStudentList();
public Optional<Student> findStudentById(long id);
}(4)编写Service实现
package com.itheima.service.Impl;

import com.itheima.domain.Card;
import com.itheima.repository.CardRepository;
import com.itheima.service.CardService;
import org.springframework.beans.factory.annotation.Autowired;
import java.util.List;
import java.util.Optional;

public class CardServiceImpl implements CardService {
    @Autowired
    private CardRepository cardRepository;
    @Override
    public List<Card> getCardList() {
        return cardRepository.findAll();
    }
    @Override
    public Optional<Card> findCardById(Long id) {
        return cardRepository.findById(id);
    }
}
package com.itheima.service.Impl;
import com.itheima.domain.Student;
import com.itheima.repository.StudentRepository;
import com.itheima.service.StudentService;
import org.springframework.beans.factory.annotation.Autowired;
import java.util.List;
import java.util.Optional;
public class StudentServiceImpl implements StudentService {
@Autowired
private StudentRepository studentRepository;
@Override
public List<Student> getStudentList() {
return studentRepository.findAll();
}
@Override
public Optional<Student> findStudentById(long id) {
return studentRepository.findById(id);
}
}(5)编写测试
package com.itheima;

import com.itheima.domain.Card;
import com.itheima.domain.Student;
import com.itheima.repository.CardRepository;
import com.itheima.repository.StudentRepository;
import org.aspectj.lang.annotation.AfterThrowing;
import org.junit.Test;
import org.junit.runner.RunWith;
import org.springframework.beans.factory.annotation.Autowired;
import org.springframework.boot.test.context.SpringBootTest;
import org.springframework.test.context.junit4.SpringRunner;

@SpringBootTest
@RunWith(SpringRunner.class)
public class OneToOneTest {
    @Autowired
    private StudentRepository studentRepository;
    @Autowired
    private CardRepository cardRepository;
    @Test
    public void testOneToOne() {
        Student student1 = new Student();
        student1.setName("好噶就");
        student1.setSex("male");
        Student student2 = new Student();
        student2.setName("会发卡号");
        student2.setSex("female");

        Card card1 = new Card();
        card1.setNum(6565);
        student1.setCard(card1);
        studentRepository.save(student1);
        studentRepository.save(student2);
        Card card2 = new Card();
        card2.setNum(7878);
        cardRepository.save(card2);
    }
}
无需建表、会自动建!运行代码,控制台输出如下:
Hibernate: create table card (id bigint not null auto_increment, num integer, primary key (id)) engine=InnoDB Hibernate: create table stdu (id bigint not null auto_increment, name varchar(255), sex enum('male','female'), card_id bigint, primary key (id)) engine=InnoDB Hibernate: alter table stdu add constraint FKgaf9vaxnpmq98oc2d8gskduk9 foreign key (card_id) references card (id)
Hibernate: insert into card (num) values (?) Hibernate: insert into stdu (card_id, name, sex) values (?, ?, ?) Hibernate: insert into stdu (card_id, name, sex) values (?, ?, ?) Hibernate: insert into card (num) values (?)
时于双向的“一对一”关系映射,发出端和接收端都要使用注解@OneToOne,同时定义一个接收端类型的字段属性和@OneToOne注解中的“mappedBy”属徃:这个在双向关系的接收端是必需的。在双向关系中,有一方为关系的发出端,另一方是关系的反端。即 “Inverse“ 端 (接收端)
实例:实现一对多映射
单向关系的一对多注解@0neToMany,只用于关系的发出端(“一”的一方)。另外,需要关系的发出端定义一个集合类型的接收端的字段属性。在一对多关联关系映射中,默认是以中间表方式来映射这种关系的。中间表的名称为“用下画线连接关系的拥有端(发出端)和Inverse端(接收端)中间表两个字段分别为两张表的表名加 下画线”_”再加主键组成。当然,也可以改变这种默认的中间表的映射方式。在关系的拥有端,使用@JoinClolum注解定义外键来映射这个关系。
(1)编写实体
package com.itheima.domain;

import lombok.Data;
import javax.persistence.*;
import java.util.List;

@Entity
@Data
public class School {
    @Id
    @GeneratedValue(strategy = GenerationType.IDENTITY)
    private Long id;
    private String name;
    @OneToMany()
    @JoinColumn(name = "school_id")
    private List<Teacher> teacherList;
}
package com.itheima.domain;
import lombok.Data;
import javax.persistence.*;
@Data
@Entity
public class Teacher {
@Id
@GeneratedValue(strategy = GenerationType.IDENTITY)
private Long id;
private String name;
@ManyToOne
private School school;
}(2)编写 Repository 层
package com.itheima.repository;
import com.itheima.domain.School;
import org.springframework.data.jpa.repository.JpaRepository;
import java.util.Optional;

public interface SchoolReposity extends JpaRepository<School,Long> {
    Optional<School> findById(Long id);
    @Override
    void deleteById(Long id);
}
package com.itheima.repository;
import com.itheima.domain.Student;
import org.springframework.data.jpa.repository.JpaRepository;
import java.util.Optional;
public interface StudentRepository extends JpaRepository<Student,Long> {
@Override
Optional<Student> findById(Long id);
@Override
void deleteById(Long id);
}(3)编写Service层
package com.itheima.service;

import com.itheima.domain.School;
import java.util.List;
import java.util.Optional;

public interface SchoolService {
    public List<School> getSchoolList();
    public Optional<School> findSchoolById(Long id);
}
package com.itheima.service;
import com.itheima.domain.Teacher;
import java.util.List;
import java.util.Optional;
public interface TeacherService {
public List<Teacher> getTeacherList();
public Optional<Teacher> findTeacherById(long id);
}(4)编写Service实现
package com.itheima.service.Impl;

import com.itheima.domain.School;
import com.itheima.repository.SchoolReposity;
import com.itheima.service.SchoolService;
import org.springframework.beans.factory.annotation.Autowired;
import java.util.List;
import java.util.Optional;

public class SchoolServiceImpl implements SchoolService {
    @Autowired
    private SchoolReposity schoolReposity;
    @Override
    public List<School> getSchoolList() {
        return schoolReposity.findAll();
    }

    @Override
    public Optional<School> findSchoolById(Long id) {
        return schoolReposity.findById(id);
    }
}
package com.itheima.service.Impl;
import com.itheima.domain.Teacher;
import com.itheima.repository.TeacherReposity;
import com.itheima.service.TeacherService;
import org.springframework.beans.factory.annotation.Autowired;
import java.util.List;
import java.util.Optional;
public class TeacherServiceImpl implements TeacherService {
@Autowired
private TeacherReposity teacherReposity;
@Override
public List<Teacher> getTeacherList() {
return teacherReposity.findAll();
}
@Override
public Optional<Teacher> findTeacherById(long id) {
return teacherReposity.findById(id);
}
}(5)编写测试
package com.itheima;

import com.itheima.domain.School;
import com.itheima.domain.Teacher;
import com.itheima.repository.SchoolReposity;
import com.itheima.repository.TeacherReposity;
import org.junit.Test;
import org.junit.runner.RunWith;
import org.springframework.beans.factory.annotation.Autowired;
import org.springframework.boot.test.context.SpringBootTest;
import org.springframework.test.context.junit4.SpringRunner;
import java.util.List;

@SpringBootTest
@RunWith(SpringRunner.class)
public class OneToManyTest {
    @Autowired
    private SchoolReposity schoolReposity;
    @Autowired
    private TeacherReposity teacherReposity;
    @Test
    public void add(){
        School school1 = new School();
        school1.setName("清华");
        schoolReposity.save(school1);
        Teacher teacher1 = new Teacher();
        teacher1.setName("张分月");
        teacher1.setSchool(school1);
        teacherReposity.save(teacher1);
    }
    @Test
    public void find(){
        School school1 = new School();
        school1 = schoolReposity.findById(Long.valueOf(1)).get();
        List<Teacher> teachers = school1.getTeacherList();
        for(Teacher teacher : teachers){
            System.out.println(teacher.getName());
        }
    }
    @Test
    public void deleteSchoolById(){
        schoolReposity.deleteById(Long.valueOf(5));
    }
    @Test
    public void deleteTeacherById() {
        teacherReposity.deleteById(Long.valueOf(5));
    }
}
控制台打印结果:
添加:
Hibernate: create table school (id bigint not null auto_increment, name varchar(255), primary key (id)) engine=InnoDB
Hibernate: create table teacher (id bigint not null auto_increment, name varchar(255), school_id bigint, primary key (id)) engine=InnoDB
Hibernate: alter table teacher add constraint FKrg46bnmgbcccayv14naymqg3r foreign key (school_id) references school (id)
Hibernate: insert into school (name) values (?)
Hibernate: insert into teacher (name, school_id) values (?, ?)
查找:
Hibernate: select school0_.id as id1_2_0_, school0_.name as name2_2_0_ from school school0_ where school0_.id=?
Hibernate: select teacherlis0_.school_id as school_i3_4_0_, teacherlis0_.id as id1_4_0_, teacherlis0_.id as id1_4_1_, teacherlis0_.name as name2_4_1_, teacherlis0_.school_id as school_i3_4_1_ from teacher teacherlis0_ where teacherlis0_.school_id=?
Hibernate: select school0_.id as id1_2_0_, school0_.name as name2_2_0_ from school school0_ where school0_.id=?
张分月
删除学校:
Hibernate: select school0_.id as id1_2_0_, school0_.name as name2_2_0_ from school school0_ where school0_.id=?
Hibernate: update teacher set school_id=null where school_id=?
Hibernate: delete from school where id=?
删除教师:
Hibernate: select teacher0_.id as id1_4_0_, teacher0_.name as name2_4_0_, teacher0_.school_id as school_i3_4_0_, school1_.id as id1_2_1_, school1_.name as name2_2_1_ from teacher teacher0_ left outer join school school1_ on teacher0_.school_id=school1_.id where teacher0_.id=?
Hibernate: delete from teacher where id=?
在双向一对多关系中,注解@OneToMany(mappedBy=’发出端实体名称小写)用于关系的发出端(即“One”的一方),同时关系的发出端需要定义一个集合类型的接收篇的字段属性;注解@ManyToOne用于关系的接收端(即“Many”的一方),关系的接收端需定义一个发出端的字段属性。
实例:实现多对多映射
(1)创建实体类
package com.itheima.domain;

import lombok.Data;
import javax.persistence.*;
import java.util.Set;

@Entity
@Data
@Table(name = "stdu")
public class Student {
    @Id
    @GeneratedValue(strategy = GenerationType.IDENTITY)
    private Long id;
    private String name;
    @Column(columnDefinition = "enum('male','female')")
    private String sex;
    @ManyToMany(fetch = FetchType.LAZY)
    @JoinTable(name = "teacher_student",joinColumns = {@JoinColumn(name = "s_id")},
            inverseJoinColumns = {@JoinColumn(name = "t_id")})
    private Set<Teacher> teachers;
}
package com.itheima.domain;
import lombok.Data;
import javax.persistence.*;
import java.util.Set;
@Data
@Entity
public class Teacher {
@Id
@GeneratedValue(strategy = GenerationType.IDENTITY)
private Long id;
private String name;
@ManyToMany(fetch = FetchType.LAZY)
@JoinTable(name = "teacher_student",joinColumns = {@JoinColumn(name = "t_id")},
inverseJoinColumns = {@JoinColumn(name = "s_id")})
private Set<Student> students;
}在“多对多”关系中需要注意以下几点:
- 关系两方都可以作为主控。
- 在 joinColumns 的@JoinColumn(name=”t_id”)中, t_id 为 JoinTable 中的外键。由于 Student 和 Teacher 的主键都为 id,所以这里省略了 referencedColumnName=”id”
- 在设计模型之间的级联关系时,要考虑好应该采用何种级联规则。
- 如果设置 cascade = CascadeType.PERSIST,则在执行 save 时会调用 onPersist()方 法。这个方法会递归调用外联类(Student或Teacher)的onPersist ()进行级联新增。 但因为值已经添加了,所以会报detached entity passed to persist错误,将级联操作取消 (去掉 “ cascade = CascadeType.PERSIST”)即可
(2)创建测试
由于Service和Repository层和上节中的一样,所以这里不再重复写代码,直接进入测试层的代码编写。如果不清楚怎么实现,请具体查看上节的源代码。创建以下测试代码
package com.itheima;

import com.itheima.domain.Student;
import com.itheima.domain.Teacher;
import com.itheima.repository.StudentRepository;
import com.itheima.repository.TeacherReposity;
import org.junit.Test;
import org.junit.runner.RunWith;
import org.springframework.beans.factory.annotation.Autowired;
import org.springframework.boot.test.context.SpringBootTest;
import org.springframework.test.context.junit4.SpringRunner;
import java.util.HashSet;
import java.util.Set;

@SpringBootTest
@RunWith(SpringRunner.class)
public class ManyToManyTest {
    @Autowired
    private StudentRepository studentRepository;
    @Autowired
    private TeacherReposity teacherReposity;
    @Test
    public void add(){
        Set<Teacher> teachers = new HashSet<Teacher>();
        Set<Student> students = new HashSet<Student>();
        Student student1 = new Student();
        student1.setName("张三");
        students.add(student1);
        studentRepository.save(student1);

        Student student2 = new Student();
        student2.setName("李刚");
        students.add(student2);
        studentRepository.save(student2);

        Teacher teacher1 = new Teacher();
        teacher1.setName("罗老师");
        teacher1.setStudents(students);
        teachers.add(teacher1);
        teacherReposity.save(teacher1);
    }
}
控制台打印如下:
Hibernate: create table teacher (id bigint not null auto_increment, name varchar(255), school_id bigint, primary key (id)) engine=InnoDB
Hibernate: create table teacher_student (t_id bigint not null, s_id bigint not null, primary key (s_id, t_id)) engine=InnoDB
Hibernate: alter table teacher add constraint FKrg46bnmgbcccayv14naymqg3r foreign key (school_id) references school (id)
Hibernate: alter table teacher_student add constraint FK5p0ij15uyb5oqnk3me34qjofn foreign key (s_id) references stdu (id)
Hibernate: alter table teacher_student add constraint FK92l319wp07ku83lxjk9bglv4u foreign key (t_id) references teacher (id)
Hibernate: insert into stdu (name, sex) values (?, ?)
Hibernate: insert into stdu (name, sex) values (?, ?)
Hibernate: insert into teacher (name) values (?)
Hibernate: insert into teacher_student (t_id, s_id) values (?, ?)
Hibernate: insert into teacher_student (t_id, s_id) values (?, ?)


